Fulfilment manager
The Fulfilment manager helps you get your stock managed when you're using external fulfilment. Also, you can use the Fulfilment manager to send shipments with products to the marketplace.
Go to
- What is the Fulfilment manager and what do you use it for?
- How to use the Fulfilment manager?
- How to enter the Fulfilment manager?
- How to add a product, multiple products, or a batch?
- How to delete a product, multiple products, or a batch?
- How to determine the priorities when using a batch and auto-tracking at the same time?
- How to mark all your products as marketplace fulfilled on specific times?
- How to mark all your products as marketplace fulfilled?
- What is auto-tracking and how to use it?
- How to manage shipments with the Fulfilment manager?
- What is stock alert and how to use it?
What is the Fulfilment manager and what do you use it for?
The Fulfilment manager is the tool to use when the marketplace is taking care of the entire fulfillment of your orders, for example, bol.com or Amazon. The Fulfilment Manager automatically switches between Logistics via bol (LvB) and own stock when your marketplace stock runs out. In case of Amazon, you can manually adjust the stock location of your products. Manually adjusting is something you can do with our free version. Automatically adjusting with auto-tracking is possible with our premium version of the Fulfilment manager. Please keep in mind that automatic tracking is only available for bol.com channels.
You can use our tool to change the status of a list of products, all your products or just let it do some magic and let it happen automatically.
How to use the Fulfilment manager?
-
- How to enter the Fulfilment manager?
To enter the Fulfilment manager, navigate to 'channels > Fulfilment manager'. In the following submenu, you define if you would like to use the Fulfilment manager for a 'product overview' or a 'batch overview'.
The difference is that a product overview is being used to insert, edit or delete individual products. This can be done per product or by inserting a list of products. A batch overview is being used to insert, edit or delete lists with products. These lists are called batches. You can easily delete a complete list instead of individual products with this option.
In the following step, you select the channel for which you would like to use the Fulfilment manager.
- How to add a product or batch to the Fulfilment manager?
To add a single product or multiple products, you need to use 'product overview'. To add a batch, you need to select 'batch overview'.
In both situations, adding products works the same.
First, give your product or batch input a name. This is for your own reference.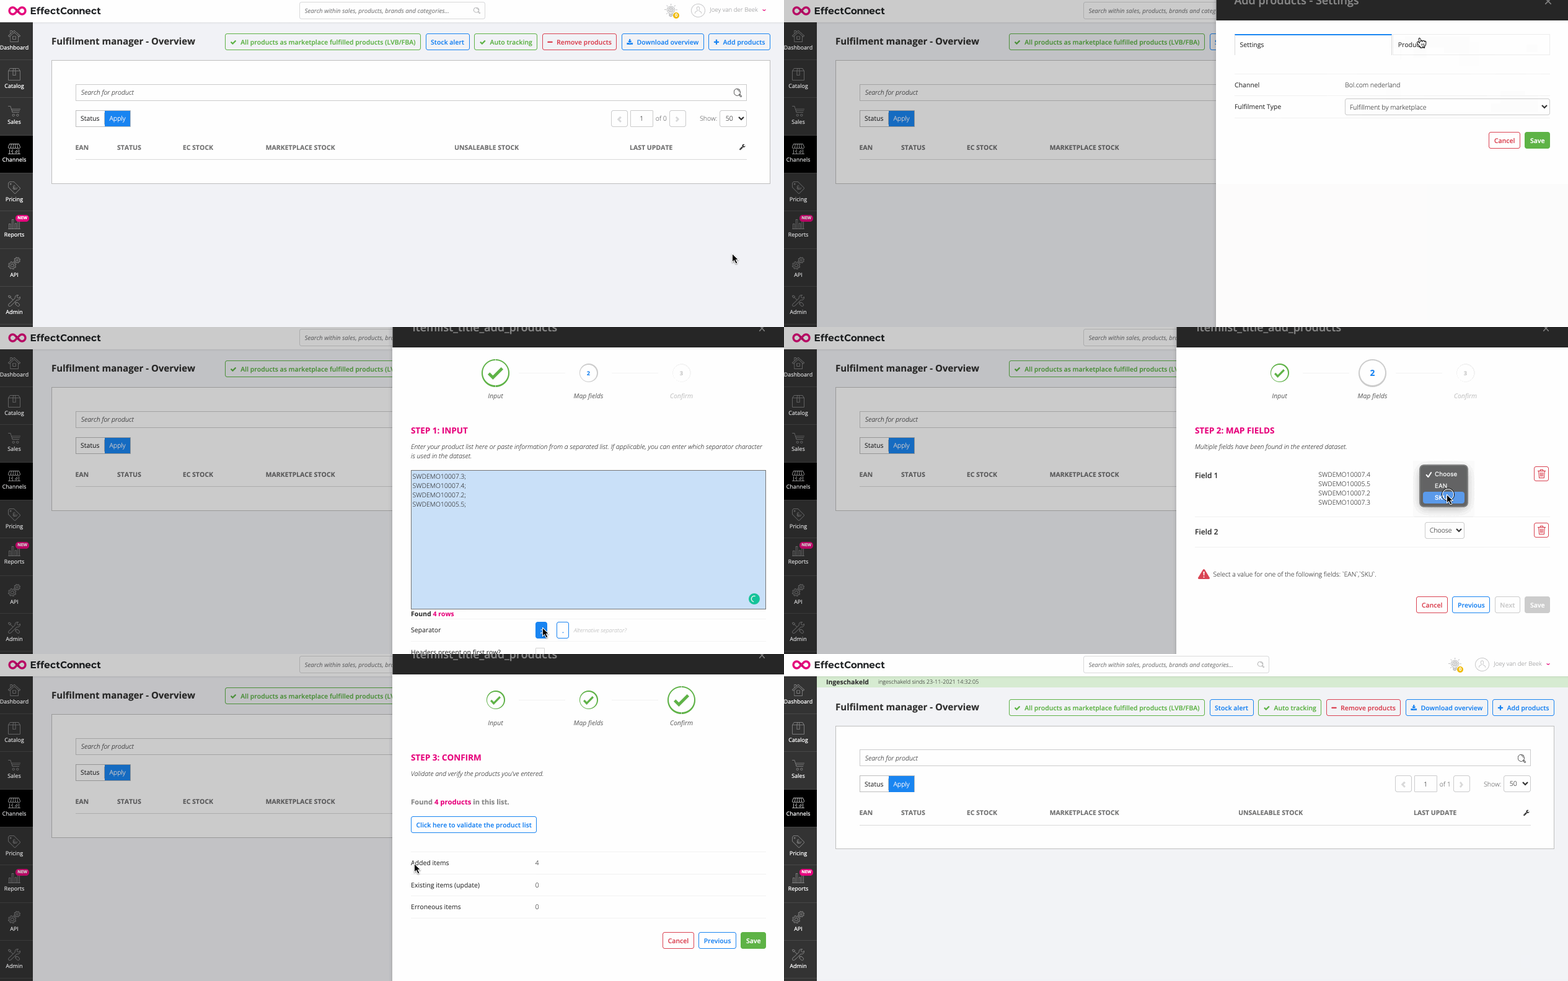
Once you're in the main screen of your product or batch overview, click on 'add products' in the top right of your screen. On the following screen, you define which status the products should get. This can be set on external fulfilment or own fulfilment.
 Good to know: when you're not using or adding products in the Fulfilment manager, they're automatically getting the status that you fulfill them by yourself. For this reason, it is not necessary to add products to the Fulfilment manager when they are not externally fulfilled.
This is a list where the first part of a rule contains the SKU and the second part the EAN code. Both identifiers are separated with a character (in this example a semicolon). You can use another character if you like, like a comma or a hashtag.
In the second tab (that says 'products') you can add products to your Fulfilment manager. In this step, you need a product list (like a CSV for example) that contains the identifiers of the products you would like to add.
Step 1: add the product list.
You need an identifier like an EAN, SKU or ID of the product. You can not work with a title or other information. An example of a good list is:
SWDEMO10007.3;123456789
SWDEMO10007.4;234567890
SWDEMO10007.2;345678901
SWDEMO10005.5;456789012
Step 2: define your separator.
In this step, you define which character you've used to separate your data. In our example, we used a semicolon (;).
Step 3: validate the products and save them.
In this final step, EffectConnect imports the products and checks if and which products are validated in EffectConnect. After saving, the products will be inserted in the Fulfilment manager. The main difference between a product and a batch is that with a batch you create a collection of products that you can easily edit, whilst products need to be adjusted manually or with a new product list import.
 - How to delete a product or batch from the Fulfilment manager?
To delete a product from the Fulfilment manager: follow the previous steps (for adding a product) but, except for choosing the button 'add products', select 'remove products'. The procedure is the same.
To delete a batch, go to your 'batch overview' and click the bin icon to remove.
- How to determine the priorities when using a batch and auto-tracking at the same time?
You can set the priorities between using a batch, or auto-tracking, by navigating to 'channels > fulfillment manager > batches'. Select the channel that you would like to configure, and next, click on 'settings' in the top right corner of the screen. - How to mark all your products as marketplace fulfilled on specific times?
It is possible to export all products as marketplace fulfilled on specific times. This can be done in the fulfilment manager via the following button:

In the following screen you can configure the time periods in which all products in the fulfilment manager are exported as own stock to this channel. Outside the times, the regular settings are used.
To disable this for a specific day it is possible to keep both times the same (ex: 12:00 - 12:00)
Note: Set the times correctly before activating this function to prevent the wrong information from being exported. - How to mark all your products as marketplace fulfilled?
If you would like to mark all your products as marketplace fulfilled, simply go to the product overview or batch overview and click the button on the top that says 'mark all products as marketplace fulfilled'.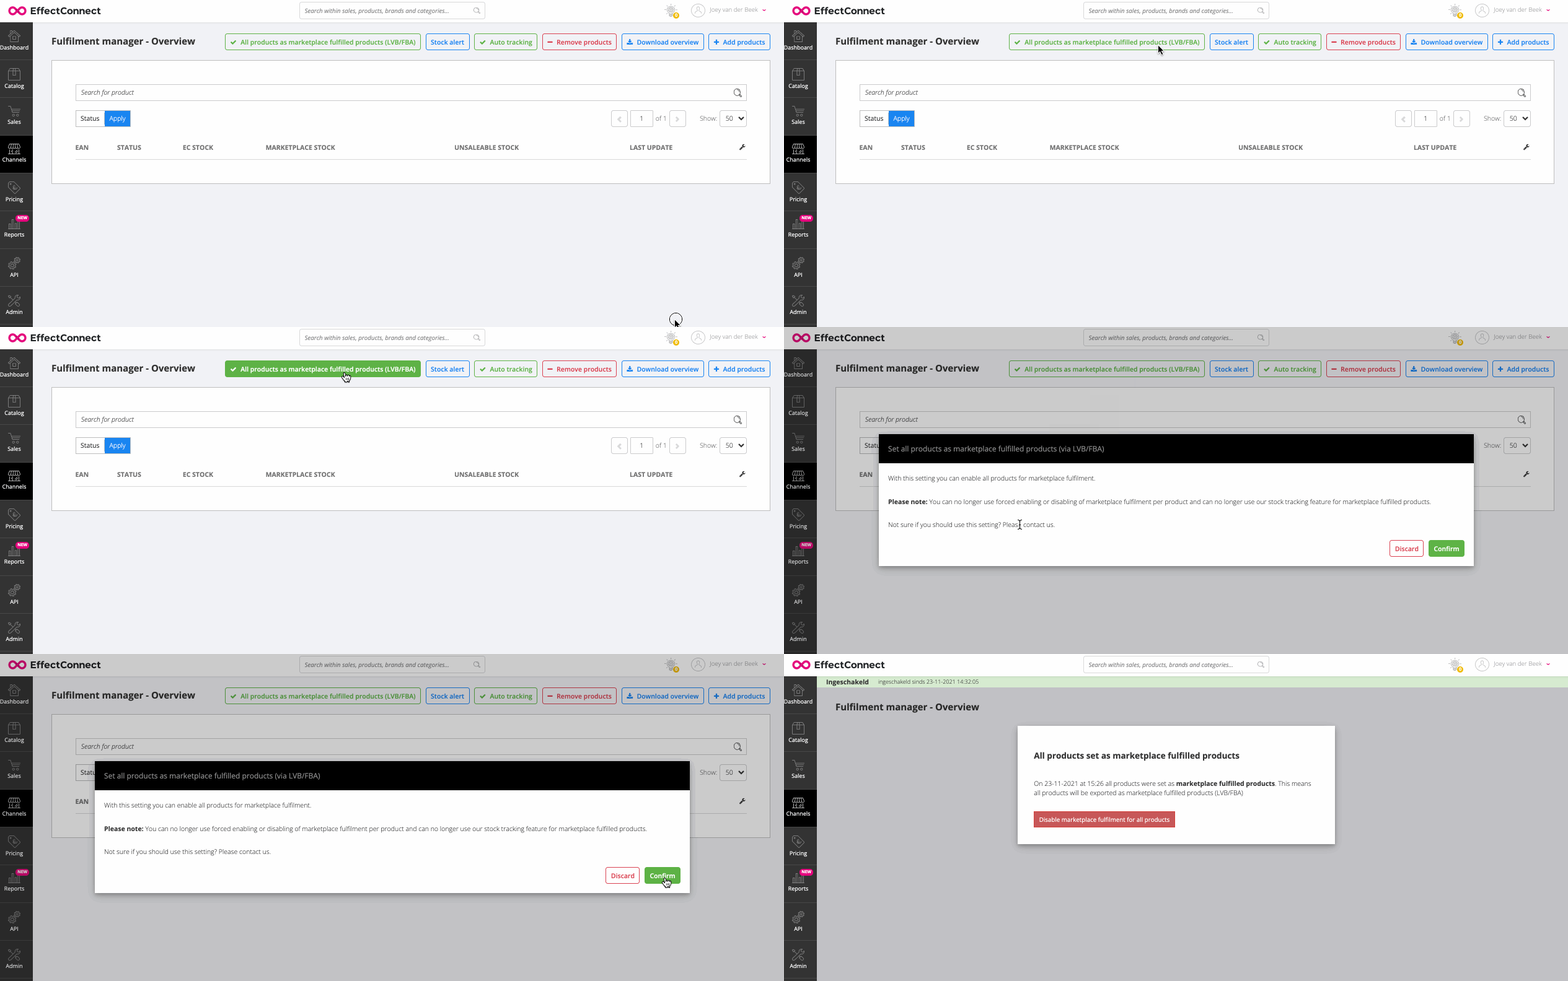
Good to know: once you activated this setting, it is not possible anymore to manually change products into a different setting. - What is auto-tracking and how to use it?
Auto-tracking is a functionality of the Fulfilment manager that offers you automation of your shipment status for a product.
With auto-tracking enabled, EffectConnect requests constantly the stock levels at the marketplace. So it basically asks how many pieces of your products are in the warehouse available. If that stock is higher than 0, EffectConnect automatically sets the product as 'shipped by marketplace'. As soon as the marketplace ran out of stock, the product will be set to 'shipped by seller'. If you would like to overrule the settings of a specific product, read this article.
At this moment, auto-tracking only functions with the marketplace of bol.com.
 Keep in mind that the auto-tracking feature is optional. Please get in touch with our support consultants for more information.
- How to enter the Fulfilment manager?
- How to manage shipments with the Fulfilment manager?
To add inventory to the warehouse of the marketplace, you send your products to the marketplace, they will add the products to their stock inventory.
When you would like to send products to the marketplace, you'll need to notify them about your shipment. You can do this on the marketplace yourself or by using the shipments module in EffectConnect. This is also a feature of the Fulfilment manager.
Before adding a shipment, consider the following:- The reference must contain a maximum of 14 characters; otherwise, the shipment will fail.
-
All products in the shipment must be listed on bol.com and have an active offer via EffectConnect. This is essential; otherwise, we cannot force the offer onto LvB.
-
Products must not be assigned to more than one batch on the same date.
- How to add a shipment?
To add shipments via the Fulfilment manager, navigate to 'Apps > Fulfilment manager > shipments overview' and click on 'add shipment'.
In the following screen, you'll add the products you would like to send in the shipment and the amount that the shipment contains. You need to define this for each product.
This procedure works with a product list separated by a specific character. This works in the exact same way as adding a product to the Fulfilment manager. You can read more about that by clicking here.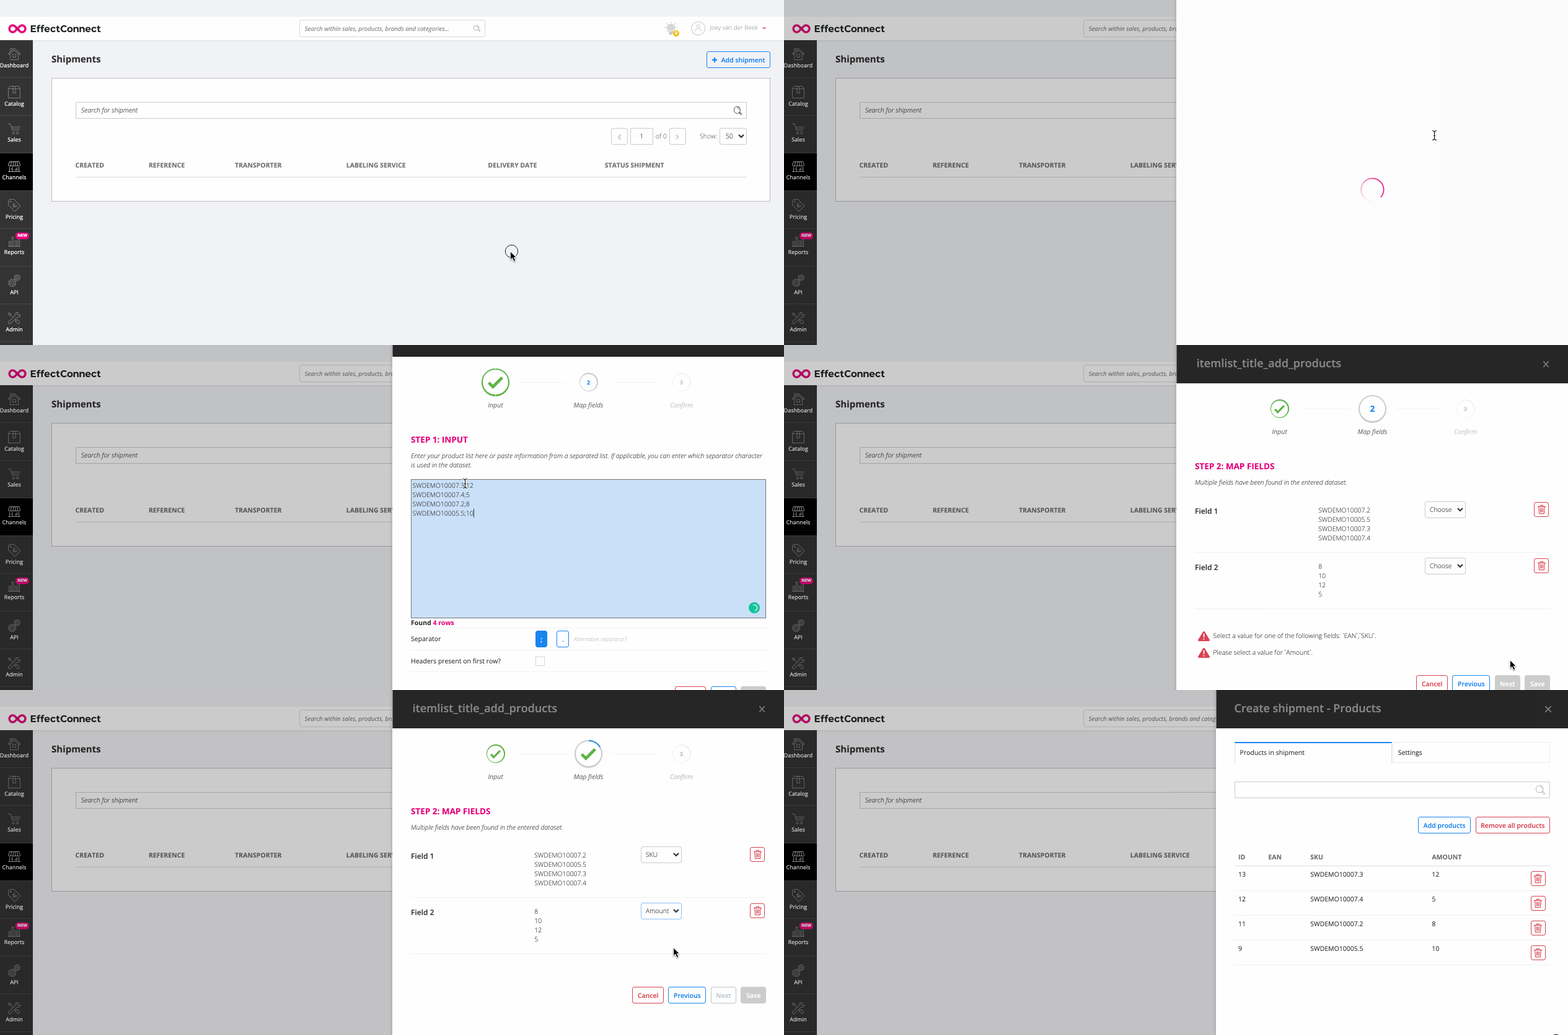
If you've added the products and amount you want, go to the second tab (named 'settings') to define your settings. You can set up a title for your shipment, the transporter you're using. If you would like to use special features of the marketplace, for example, the bol.com label service (if you're not sure how to use this, please contact bol.com for more information about your situation) and the date you're going to send the shipment.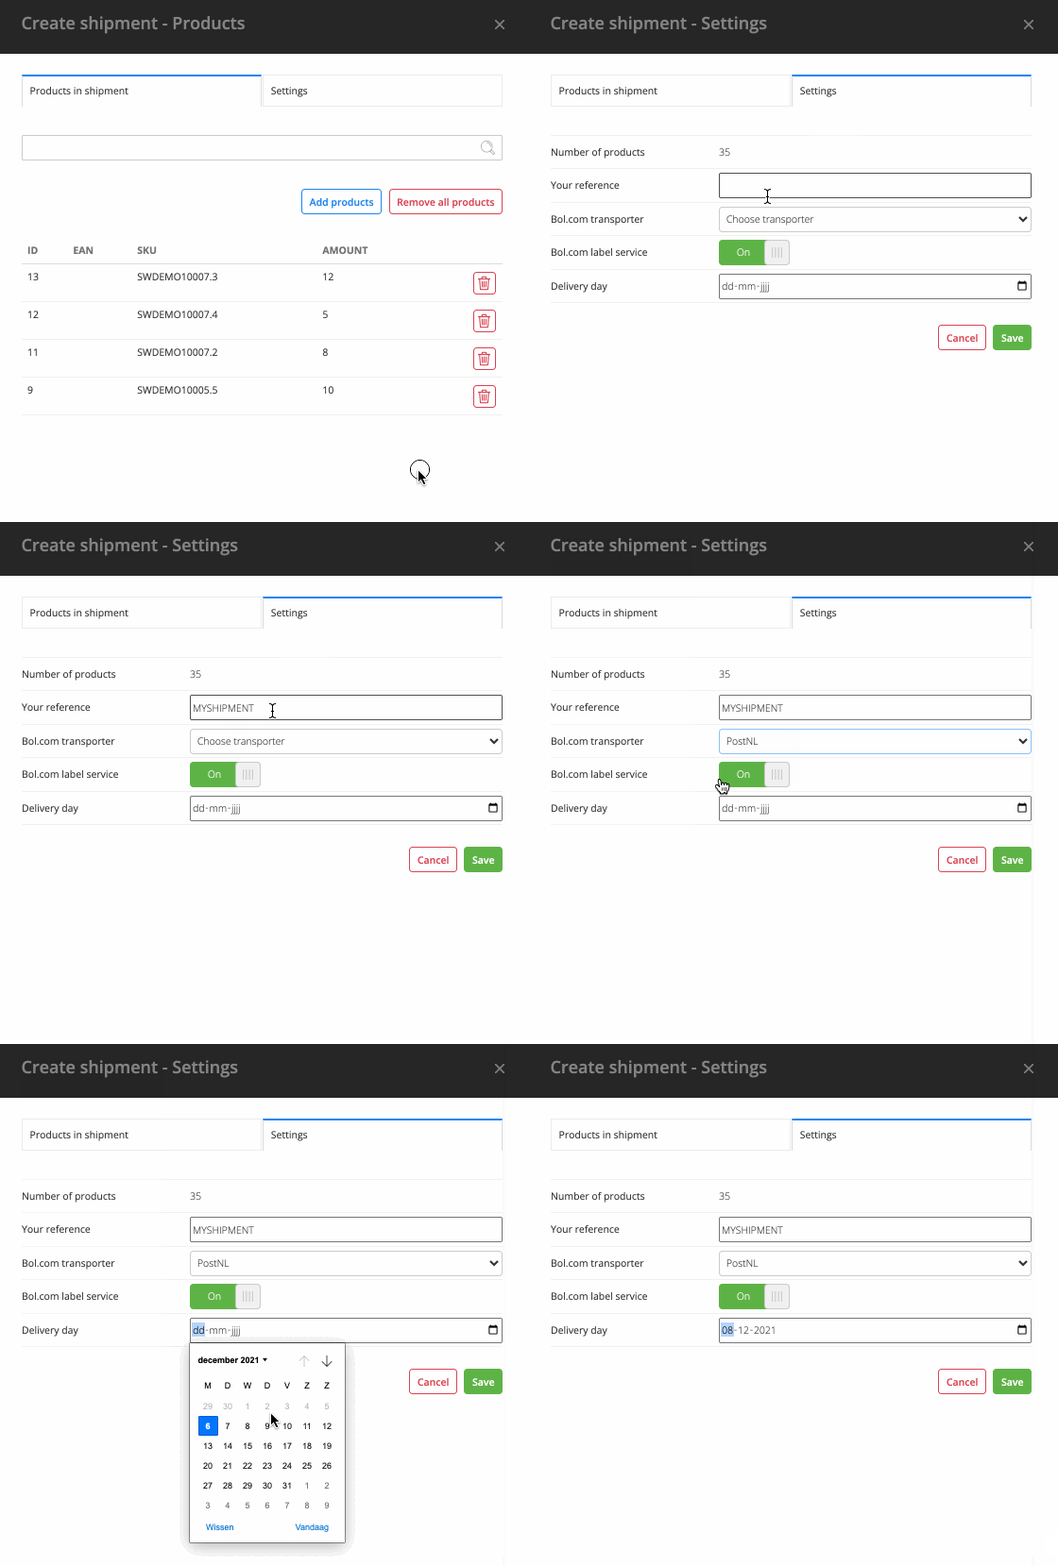
After saving your shipment, EffectConnect will send this to the marketplace. On the shipments overview page, you can follow the progress of the shipment. First, the shipment request will be sent to the marketplace and after they approve the request, the status will be changed in the overview in EffectConnect.
![]() Good to know: it can take up to 60 minutes before a shipment is accepted by a marketplace. It is not possible to edit or delete your shipment afterward.
Good to know: it can take up to 60 minutes before a shipment is accepted by a marketplace. It is not possible to edit or delete your shipment afterward.
-
- What is stock alert and how to use it?
Within the fulfillment manager, you can use a feature called stock alert, which informs you when your stock at the marketplace is running out. You can configure this alert yourself and define a threshold so the alert only gets triggered when you want this.
At this moment, the stock alert is only available for bol.com channels.
To use the stock alert, go to your fulfillment manager (product) overview and click 'stock alert' on the top of the screen to configure your alert.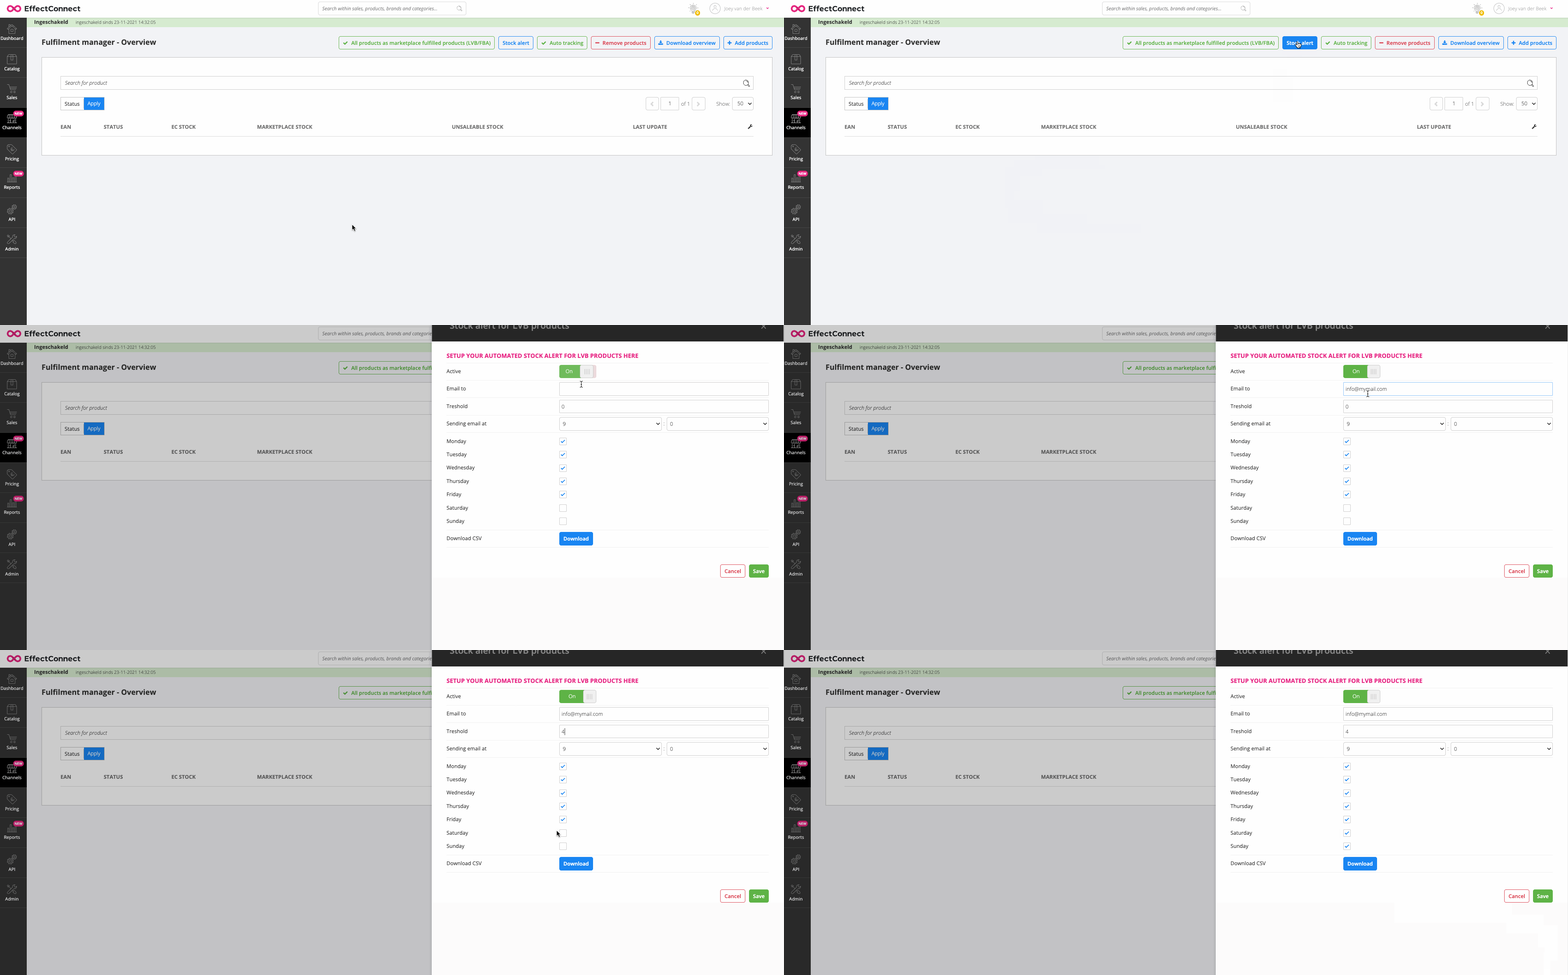
- What is stock alert and how to use it?